Setting up an email server on Debian Trixie with Postfix, Dovecot and rspamd
If you just want to get to the guide, click here to go directly there and skip the what and why
What are we building?#
In a sentence, we’re going to build a mail server that only enables secure logins, has spam filtering and handles at-rest encryption for our emails. Sounds simple enough, right? Unfortunately, email is a fifty-plus year-old technology that has grown organically since the early internet and is premised on the idea of a network where people broadly kind of trust each other and we don’t have to concern ourselves with mitigating the risks of unauthorised access, spam and other miseries. We’re dealing with 2026 issues on the base of 1970s technologies: it’s a challenging setup.
Email is a distributed, federated system (as anything good is) and consists of a number of services speaking to each other locally and over the internet. At a high level, it looks something like this:
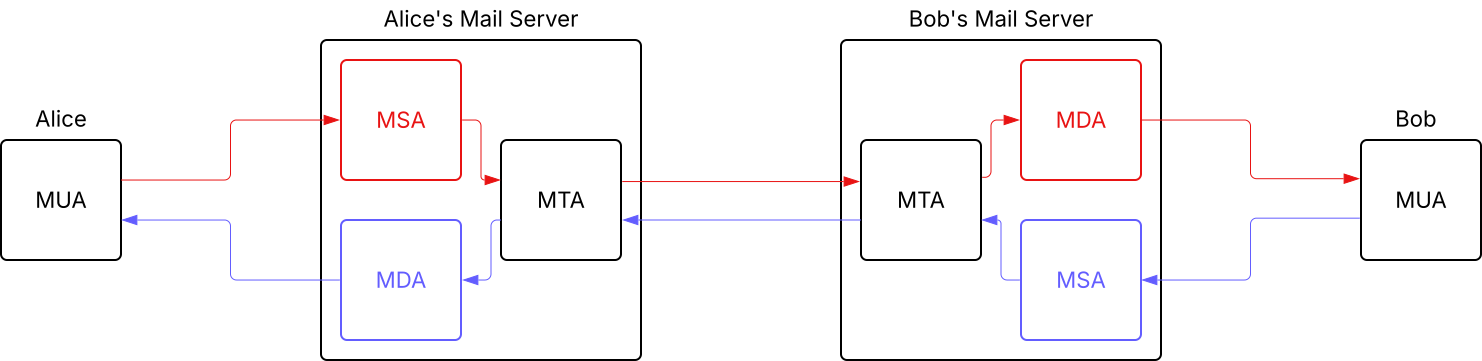
To get emails received and sent, we need four components, in a broad sense:
- MTA: Our Mail Transfer Agent, in our case Postfix, the thing that handles the transfer of emails from one mail server to another
- MSA: Our Mail Submission Agent, in our case also Postfix, the thing that handles the submission of emails to an MTA from end-users to their email server
- MDA: Our Mail Delivery Agent, in our case Dovecot, the thing that the MTA will hand off emails to handle their delivery into a user’s mailbox
- MUA: Our Mail User Agent, think Thunderbird or any webmail client: the thing that users do their email in
There is more to it, of course: we have to think about how these things all communicate with each other and how we can authenticate users and share authentication context between them, as well as how other agents, such as rspamd can interfere with the flow of emails from A to B. There are a couple of extra concepts that need to be introduced before we can understand all of what we’ll be doing here.
- SASL: though not exclusively an email thing, Simple Authentication and Security Layer provides a standardised means by which authentication can be performed by different components of our mail server
- LMTP: Local Mail Transport Protocol will be how our MTA communicates with our MDA. In the olden days, a Local Delivery Agent (LDA) would be used to transfer email from MTA to MDA, with a process being instantiated for every email that an MTA would recieve and the message transferred via a UNIX pipe to that process. LMTP replaces the LDA process-based model with a long-running daemon that doesn’t need to be pipe-able to, so could potentially exist on a different server. We can scale, if we ever had the horrors of having to do so.
- milters: mail filters are applications that can be invoked as part of the mail receipt or sending process undertaken by the MTA to interact with the messages before they are received (think about rejecting a spam message, for example) or sent (think about cryptographic signing of outbound messages to assure the origin of the message)
Putting all of this together, we end up with components that handle the sending and receipt of email, the client interactions with the server and means by which our server components can exchange data.
Why are we building it?#
I resent the prospect of paying ~£5/month/user from now until the end of time for an email address under a domain I own. Yes, I am aware I can use Zoho’s mail service for free with a custom domain, but being reliant upon the charity of corporations for the provision of a service like email feels bad. I’ve done that before with the free tier of Google’s Workspace (Google for Business at the time, maybe?) and that didn’t end particularly well with Google doing what Google does and sunsetting the offering.
Are we exchanging our time for our money by managing this ourselves? We absolutely are, but there’s a virtue in that: we get the opportunity to learn our lessons about the risks of misconfiguration impacting mail deliverability for ourselves and resolve to not let errors recur. What’s more valuable than that? Very little, to me.
Prerequisites#
We’re going to need:
- A server somewhere on the internet, with a static IP address and an
A-record that points to it from any domain/subdomain (this will be our$MAILSERVER_DOMAIN_NAME). The system hostname should be the same as this domain. - A fresh install of Debian Trixie
- A domain name that you want to send emails from, henceforth known as
$DOMAIN_NAME - A reverse DNS entry that points to the domain above
Setting it all up#
Through this guide, we’re going to end up with the following applications set up, hopefully working in concert to give us a working mail server.
Initial DNS set-up#
I don’t know how you’re managing your DNS, but we need, to start, a couple of DNS records for any of this to work at all, up front because I still don’t trust how long DNS can take to propagate. We need an MX record for our domain that points to the domain name of the server with priority 10. For me, this looks something like:
$DOMAIN_NAME. MX 10 $MAILSERVER_DOMAIN_NAME
Fetching required packages#
Everything we’re using in this setup is available in the base Debian Trixie repositories, so we’ll have an easy time of installing what we need.
apt install postfix postfix-mysql dovecot-core dovecot-mysql \
  dovecot-imapd dovecot-lmtpd mariadb-server certbot rspamd \
  redis
By default, this will enable and start some services that we don’t necessarily want running until we have completed our configuration hardening. Let’s stop them for now with systemctl stop dovecot postfix.
Getting our TLS certificates#
We want to make sure that we can expose secure endpoints: we will want to make sure that we have certificates from a source that is trusted by default in most places: Let’s Encrypt is one such provider, and they provide them for free, so it would be simply rude not to. The certbot application we installed will handle the authentication of our server as the one behind $DOMAIN_NAME.
We need to run certbot certonly -d $MAILSERVER_DOMAIN_NAME to get our certificates. We’ll be presented with a few options: we should choose option 1 to present an HTTP server for the ACME validation to run against. We’ll hopefully see success and then receive the certificate at /etc/letsencrypt/live/$MAILSERVER_DOMAIN_NAME/fullchain.pem and the private key at /etc/letsencrypt/live/$MAILSERVER_DOMAIN_NAME/privkey.pem.
We’ll want to add the following to /etc/letsencrypt/renewal-hooks/post/mail-restart.sh and then chmod +x that file:
systemctl restart postfix dovecot
This way, when the certificates are renewed by the default systemd timer that is installed with the package, Dovecot and Postfix will be restarted to adopt the new certs.
MariaDB, our store of user and domain metadata#
We’ll use MariaDB to store all of our information about our users, our domains and aliases. This gives us a good way to dynamically add and remove configuration without the need to modify any static configuration manually.
First, we’ll set up a new user to manage the mail database we’ll create, setting its password to $MARIADB_MAIL_PASSWORD. If we run mariadb -u root as the system root user, we’ll be connected through the secure local socket to the database as the database root user. From there, we’ll create our user:
CREATE DATABASE mail;
CREATE USER 'mail'@'127.0.0.1' IDENTIFIED BY '$MARIADB_MAIL_PASSWORD';
GRANT SELECT ON mail.* TO 'mail'@'127.0.0.1';

FLUSH PRIVILEGES;
We’ll want to exit the prompt with a Ctrl-D and then run rm ~/.mariadb_history to remove the client history which will contain our password. Better to be safe than sorry on this one.
Log in to the MariaDB again and we’ll create our tables:
USE mail;
CREATE TABLE domains (
  id INT NOT NULL AUTO_INCREMENT KEY,
  name VARCHAR(128) NOT NULL
) ENGINE=InnoDB DEFAULT CHARSET=utf8;

CREATE TABLE users (
  id INT NOT NULL AUTO_INCREMENT KEY,
  domain_id INT NOT NULL,
  password VARCHAR(128) NOT NULL,
  email VARCHAR(128) NOT NULL,
  UNIQUE KEY email (email),
  FOREIGN KEY (domain_id) REFERENCES domains(id) ON DELETE CASCADE
) ENGINE=InnoDB DEFAULT CHARSET=utf8;

CREATE TABLE aliases (
  id INT NOT NULL AUTO_INCREMENT KEY,
  domain_id INT NOT NULL,
  source VARCHAR(128) NOT NULL,
  destination VARCHAR(128) NOT NULL,
  FOREIGN KEY (domain_id) REFERENCES domains(id) ON DELETE CASCADE
) ENGINE=InnoDB DEFAULT CHARSET=utf8;
We’ll want to populate our first domain and user so we actually have something for Postfix and Dovecot to try to authenticate against.
INSERT INTO domains (name) VALUES ('$DOMAIN_NAME');
To go along with our new domain registration, we’ll need a new user, with a nice, secure password. Dovecot provides the tool doveadm which, among a litany of other things, can generate secure hashes for passwords. Create a password hash with doveadm pw -s BLF-CRYPT -r 10, and you’ll be prompted to enter a password. Do so, make it a good one. A hash will be output starting with the string $2y. Copy that hash and paste it into the following MariaDB statement in place of $PASSWORD_HASH:
INSERT INTO users (domain_id, password, email) VALUES (1, '$PASSWORD_HASH', '$USER@$DOMAIN_NAME');
It’s good practice to have a postmaster account for each domain to receive DMARC reports or other information concerning mail deliverability. Repeat this again for a new postmaster account: generate a new password and create the user:
INSERT INTO users (domain_id, password, email) VALUES (1, '$POSTMASTER_PASSWORD_HASH', 'postmaster@$DOMAIN_NAME');
We have a configured database and data ready for our other components to make authentication decisions against.
Postfix, our MTA#
One configuration file is simply not enough in the world of Postfix: we’re going to have to make changes to a total of six files here. We start with /etc/postfix/main.cf:
smtpd_tls_cert_file=/etc/letsencrypt/live/$MAILSERVER_DOMAIN_NAME/fullchain.pem
smtpd_tls_key_file=/etc/letsencrypt/live/$MAILSERVER_DOMAIN_NAME/privkey.pem
smtpd_tls_security_level=may
smtpd_tls_auth_only=yes
smtpd_sasl_security_options=noanonymous,noplaintext
smtpd_sasl_tls_security_options=noanonymous
smtpd_sasl_local_domain=$myhostname
broken_sasl_auth_clients=yes
smtpd_sasl_type=dovecot
smtpd_sasl_path=private/auth
smtpd_sasl_auth_enable=yes

smtpd_helo_restrictions=permit_mynetworks,permit_sasl_authenticated,reject_invalid_helo_hostname,reject_non_fqdn_helo_hostname
smtpd_recipient_restrictions=permit_mynetworks,permit_sasl_authenticated,reject_non_fqdn_recipient,reject_unknown_recipient_domain,reject_unlisted_recipient,reject_unauth_destination
smtpd_sender_restrictions=permit_mynetworks,permit_sasl_authenticated,reject_non_fqdn_sender,reject_unknown_sender_domain
smtpd_relay_restrictions=permit_mynetworks,permit_sasl_authenticated,defer_unauth_destination

virtual_transport=lmtp:unix:private/dovecot-lmtp
virtual_mailbox_domains=mysql:/etc/postfix/mysql-mailbox-domains.cf
virtual_mailbox_maps=mysql:/etc/postfix/mysql-mailbox-maps.cf
virtual_alias_maps=mysql:/etc/postfix/mysql-alias-maps.cf,mysql:/etc/postfix/mysql-email2email.cf

disable_vrfy_command=yes
strict_rfc821_envelopes=yes
smtpd_helo_required=yes
smtp_always_send_ehlo=yes

smtpd_milters = inet:localhost:11332
non_smtpd_milters = inet:localhost:11332
milter_default_action = accept
milter_protocol = 6
There’s a lot going on here, including the declaration of config files for our lookups in MariaBD. The broad thrust of these changes is that we only want to let SASL-authenticated users be able to send or relay mail through our Postfix server. We also set up our rspamd milter now, but setting that up is an exercise for later.
Next up is /etc/postfix/master.cf, where we add the following at the bottom of the file:
submission inet n       -       y       -       -       smtpd
  -o syslog_name=postfix/submission
  -o smtpd_tls_security_level=encrypt
  -o smtpd_sasl_auth_enable=yes
  -o smtpd_sasl_type=dovecot
  -o smtpd_sasl_path=private/auth
  -o smtpd_reject_unlisted_recipient=no
  -o smtpd_client_restrictions=permit_sasl_authenticated,reject
  -o milter_macro_daemon_name=ORIGINATING
smtps     inet  n       -       -       -       -       smtpd
  -o syslog_name=postfix/smtps
  -o smtpd_tls_wrappermode=yes
  -o smtpd_sasl_auth_enable=yes
  -o smtpd_sasl_type=dovecot
  -o smtpd_sasl_path=private/auth
  -o smtpd_client_restrictions=permit_sasl_authenticated,reject
  -o milter_macro_daemon_name=ORIGINATING
Here we define that Postfix should run processes for the submission and smtps services and apply TLS and authentication requirements for them.
Next, we need to create the four configuration files that will be used to look up users and domains from our MariaDB:
/etc/postfix/mysql-mailbox-domains.cf
user = mail
password = $MARIADB_MAIL_PASSWORD
hosts = 127.0.0.1
dbname = mail
query = SELECT 1 FROM domains WHERE name='%s'
/etc/postfix/mysql-mailbox-maps.cf:
user = mail
password = $MARIADB_MAIL_PASSWORD
hosts = 127.0.0.1
dbname = mail
query = SELECT 1 FROM users WHERE email='%s'
/etc/postfix/mysql-alias-maps.cf:
user = mail
password = $MARIADB_MAIL_PASSWORD
hosts = 127.0.0.1
dbname = mail
query = SELECT destination FROM aliases WHERE source='%s'
/etc/postfix/mysql-email2email.cf:
user = mail
password = $MARIADB_MAIL_PASSWORD
hosts = 127.0.0.1
dbname = mail
query = SELECT email FROM users WHERE email='%s'
Given that these files all have credentials in them, we should make sure only root can actually view what’s in them: run chmod 600 /etc/postfix/mysql-mailbox-domains.cf /etc/postfix/mysql-mailbox-maps.cf /etc/postfix/mysql-alias-maps.cf /etc/postfix/mysql-email2email.cf
We can now run postfix check to check the config for any errors before restarting the service with systemctl postfix restart.
From there, we can check our MariaDB integration by running the following commands:
postmap -q $DOMAIN_NAME mysql:/etc/postfix/mysql-mailbox-domains.cf
postmap -q $USER@$DOMAIN_NAME mysql:/etc/postfix/mysql-mailbox-maps.cf
If all is well, these should return successfully.
Dovecot, our MDA#
Debian Trixie ships Dovecot 2.4, which introduced a lot of breaking config changes from 2.3. Fortunately, our installation is a new one and we needn’t bother ourselves with such things - I will, however, try to highlight where these changes may trip people up in case they come across this article having had some fun trying to work this out for myself.
The heart of this setup is the hosting of user data virtually and not relying on POSIX users and groups present on the host to map to mail user entities. This does, however, mean that we need to create a user that will be able to perform operations (mainly filesystem reads and writes) on the host on behalf of our virtual users. In our case, we’ll create a user called vmail to do this:
mkdir -p /var/mail/vhosts/[EMAIL_DOMAIN]
groupadd -g 5000 vmail
useradd -g vmail -u 5000 vmail -d /var/mail --shell /usr/sbin/nologin
chown -R vmail:vmail /var/mail
There’s only one change that we want to make in the /etc/dovecot/dovecot.conf file, and that’s ensure that we have a postmaster address set:
postmaster_address = postmaster@$MAIL_DOMAIN
We’re going to configure mailbox encryption with a global key in our configuration. Dovecot 2.4 does offer the option of per-folder keys for encryption, but it’s apparently not production ready and some of the documentation refers to using pbkdf2 as a hash function as part of providing keys for the encryption of user master keys, which doesn’t work: I wasn’t heartened by this. To me, the use of a singular global encryption key was sufficient to mitigate the risk of the mail folders themselves being compromised. To generate our keys:
cd /etc/dovecot/private
openssl ecparam -name secp521r1 -genkey | openssl pkey -out ecprivkey.pem
openssl pkey -in ecprivkey.pem -pubout -out ecpubkey.pem
Now we can configure the /etc/dovecot/conf.d/10-mail.conf to establish where we will store our mail files and and how we will encrypt them:
mail_driver = maildir
mail_path = /var/mail/vhosts/%{user|domain}/%{user|username}/Maildir
mail_home = /var/mail/vhosts/%{user|domain}/%{user|username}
mail_plugins = {
  mail_crypt = yes
}

crypt_global_public_key_file = /etc/dovecot/private/ecpubkey.pem
crypt_global_private_key main {
  crypt_private_key_file = /etc/dovecot/private/ecprivkey.pem
}
We now want to edit /etc/dovecot/conf.d/10-auth.conf to uncomment the line #!include auth-sql.conf.ext. Following that, we need to set up how we’re doing authentication against MariaDB by editing that auth-sql.conf.ext file as follows:
# ---------------------------------------------------------
# SQL Database Connection Settings
# ---------------------------------------------------------
sql_driver = mysql

mysql 127.0.0.1 {
  dbname = mail
  user = mail
  password = $MARIADB_MAIL_PASSWORD
}

# ---------------------------------------------------------
# Authentication Database (Passwords)
# ---------------------------------------------------------
passdb sql {
  default_password_scheme = BLF-CRYPT
  query = SELECT email AS user, password FROM users WHERE email='%{user}';
}

# ---------------------------------------------------------
# User Database (Mailbox Locations & Permissions)
# ---------------------------------------------------------
userdb static {
  fields {
    uid = vmail
    gid = vmail

    home = /var/mail/vhosts/%{user | domain}/%{user | username}
  }
}
Given that we have a MariaDB password just hanging out in this file, let’s ensure no one else can read it: chmod 600 /etc/dovecot/conf.d/auth-sql.conf.ext
Now to establish what processes should start as part of Dovecot, we need to edit /etc/dovecot/conf.d/10-master.conf:
service imap-login {
  inet_listener imap {
    port = 0
  }
  inet_listener imaps {
    port = 993
    ssl = yes
  }
}

service lmtp {
  unix_listener /var/spool/postfix/private/dovecot-lmtp {
    mode = 0600
    user = postfix
    group = postfix
  }
}

service auth {
  unix_listener /var/spool/postfix/private/auth {
    mode = 0660
    user = postfix
    group = postfix
  }
  unix_listener auth-userdb {
    mode = 0600
    user = vmail
  }
  user = dovecot
}

service auth-worker {
  user = vmail
}
Here, we define that we shouldn’t have an insecure IMAP listener and set up LMTP and authentication to support Postfix’s delivery of email. In order to support our lack of an insecure IMAP endpoint, we should also edit /etc/dovecot/conf.d/10-ssl.conf to ensure that the ssl_server_cert_file and ssl_server_key_file directives point to the same TLS certificate and key that we pointed to for Postfix.
We then need to edit /etc/dovecot/conf.d/20-lmtp.conf and ensure that auth_username_format is set to auth_username_format = %{user | lower}. The default in Debian is configured to strip the domain from the username passed to the auth-worker, which is not right for our use case. We should also ensure that we have a postmaster_address configured in the LMTP block to handle undeliverable messages.
We can then restart Dovecot with systemctl restart dovecot
rspamd, our “stuff in the middle” (spam filtering and DKIM)#
First of all, we need to secure our Redis installation by specifying a requirepass ($REDIS_PASSWORD) in /etc/redis/redis.conf. After we’ve done this, we can run systemctl restart redis. We can then configure Redis for rspamd with the following in /etc/rspamd/local.d/redis.conf:
servers = "127.0.0.1:6379";
timeout = 1s;
password = "$REDIS_PASSWORD";
We then want to set our default filtering thresholds in /etc/rspamd/local.d/actions.conf:
reject = 15;        # Reject obvious spam
add_header = 6;     # Add spam headers, deliver
greylist = 4;       # Temporarily delay suspicious messages
We’ll want to generate a shared secret for the rspamd worker and controller to use: we can do that with rspamadm pw. Copy the hash ($RSPAM_PW) and edit /etc/rspamd/local.d/worker-controller.inc:
password = "$RSPAM_PW";
bind_socket = "localhost:11334";
Our proxy worker then needs to be configured in /etc/rspamd/local.d/worker-proxy.inc:
milter = yes;
timeout = 120s;
upstream "local" {
  default = yes;
  self_scan = yes;
}
For DKIM signing, we’ll first have to generate a set of keys and then add them to configuration. $SELECTOR here is just a string to identify a particular key and can be an arbitrary string as long as that string can form part of a DNS name.
mkdir /etc/rspamd/dkim
cd /etc/rspamd/dkim
chown -R _rspamd:_rspamd /etc/rspamd/dkim
rspamadm dkim_keygen -b 2048 -s $SELECTOR -d $DOMAIN_NAME -k $SELECTOR.key
The final command will output a DNS record. Add it to your $DOMAIN_NAME DNS with the name $SELECTOR._domainkey.$DOMAIN_NAME as a TXT record.
We can then incorporate the signing configuration into /etc/rspamd/local.d/dkim_signing.conf:
# Enable DKIM signing
enabled = true;

# Default signing configuration
domain {
  $DOMAIN_NAME {
    selector = "$SELECTOR";
    path = "/etc/rspamd/dkim/$SELECTOR.key";
  }
}

# Sign outbound mail only
sign_authenticated = true;
sign_local = true;
sign_inbound = false;

# Default settings
use_esld = true;
check_pubkey = true;
Run systemctl restart rspamd and we’re all done.
Final DNS setup#
We’ll want to set up our DNS records for DKIM, SPF and DMARC set up: this will increase our deliverability and reduce our chances of ending up in spam when we send email. These are DNS records that work in concert to provide an attestation to receiving mail servers that mail from our domain is authentic and solicited.
SPF#
The simplest of the three, SPF simply says “this is who is allowed to send email for this domain and is represented as a TXT DNS record for the $DOMAIN_NAME.
v=spf1 mx ip4:$IPV4_ADDRESS_OF_MAILSERVER ip6:$IPV6_SUBNET_OF_MAILSERVER ~all
In this example, the SPF record states that servers in my MX records are able to send email for my domain, as well as servers identified by the IPv4 and IPv6 addresses specified in the record. ~all says “for anything else, treat it as spam.”
DKIM#
DKIM records say “I will sign my emails with a key; this is the public key that you can use to verify that signature.” Ultimately, this is an attestation that the server that sent the email on behalf of the domain does indeed at least have access to secret that only the owner of the domain should have access to.
DMARC#
DMARC records say “this is what you should do with my emails if they don’t fit my SPF policy or the signatures you receive are wrong.” You also define your postmaster address as a place that other mail servers can send reports of what activity is occurring from your domain.
An example DMARC record would be a TXT record at _dmarc.$DOMAIN_NAME that looked like:
v=DMARC1; p=quarantine; rua=mailto:postmaster@$DOMAIN_NAME
You need all of them#
You need all of these records to have a chance of getting your email delivered and not sent to people’s spam folders. Once set up, it’s not that difficult - but the complexity of generating them in the first place can be overwhelming. MXToolbox has some great tools to validate that the DNS records you have are correct and look good.
Why might all of this effort be futile?#
There are, most definitely, difficulties with hosting your own email: to say otherwise would be to mislead. Even with the good things we’ve done in our configuration to make sure that we’re making attestations of the trustworthiness mail that originates from our domain through the configuration of SPF, DKIM and DMARC, we need the big email providers (Gmail, Outlook and Yahoo! I guess?) to believe that we are, in fact, the goodest of boys and girls and won’t be spamming their users. This is a tough thing to do, and it’s not documented anywhere. Your server (especially if it was cheap) could be in a network neighbourhood with some more nefarious people than you are and your IP could be on spam blocklists. There are some tools to help diagnose if that is the case, but it’s not the only reason these provider may see smaller providers as “spammy”. The full list, however, and I suppose for good reason, is not published anywhere. You just have to be on your best behaviour for all time.
Personally, I’m engaging in email conversations with myself via Gmail to show that messages from my domains can and will be interacted with by recipients. We’ll call this a modern day ceremony to summon rain from the gods: it is absolutely hope and a prayer.
What’s next?#
We now have a working mail server that can send and receive mail and provide some assurances that the mail sent by the server is ‘authorised’ by the domain owner. That’s no small feat! There’s always room for expansion, though:
- More advanced configuration of rspamd to include Bayesian and other statistical methods of identifying spam
- Integration of Dovecot with Xapian for full-text search optimisation in inboxes
- Delivery of a highly-available email solution using something like GlusterFS as the storage backend
- Proactive monitoring of the components to identify operational and potential security risks
Maybe I’ll get around to these things, but I’m satisfied enough for now having to ask Gmail users to check their spam for things I’ve sent them.